
2.4 Imaging, headless set-up, and remote access

In production, and in almost every lab exercise in this book, your embedded Linux gateway operates headless: without an HDMI monitor, USB keyboard, or mouse attached. Being able to flash an operating system image, bring the board onto a network (or connect to it directly when no router is available), authenticate securely over SSH, and fall back to a hardware serial console when networking fails is a core skill for every embedded engineer.
In Lab 1 (Section 1.7), you performed a quick first boot. This section explains how Raspberry Pi OS (Trixie, with notes on Bookworm where it differs) handles OS customisation, why legacy configuration tricks from older Raspberry Pi tutorials no longer work, and how to connect to a gateway under any network condition.
Flashing and pre-configuring with Raspberry Pi Imager
Section titled “Flashing and pre-configuring with Raspberry Pi Imager”Historically, flashing an embedded Linux image required downloading a raw .img file, writing it block-by-block with dd (sudo dd bs=4M if=image.img of=/dev/sdX status=progress) or Win32DiskImager, and then manually editing files on the FAT boot partition.
Today, Raspberry Pi Imager is the standard provisioning tool on Windows, macOS, and Linux. Imager 2.x is a step-by-step wizard: you choose the board (Raspberry Pi 4 or Raspberry Pi 5), the operating system (Raspberry Pi OS Lite (64-bit) is under Raspberry Pi OS (other)) and the storage device, and it then asks for the customisation settings (hostname, user, Wi-Fi and SSH).1
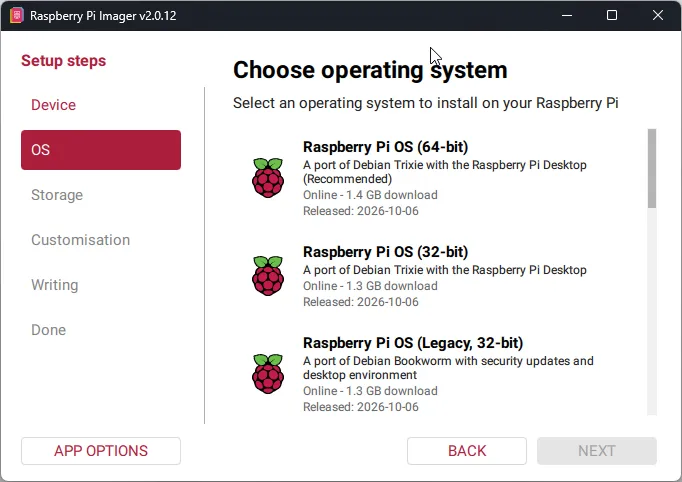
Figure 2.9. Raspberry Pi Imager v2.0.12 at the Choose operating system step. The setup steps run down the left; the recommended image is Raspberry Pi OS (64-bit), based on Debian Trixie, and the Bookworm image is listed as Legacy.
For a Trixie image, Imager writes those settings to the boot partition (bootfs, mounted at /boot/firmware/ once booted) as two cloud-init files: user-data (hostname, user account, SSH keys, locale) and network-config (the Wi-Fi network, in Netplan format).2 For the older Bookworm (Legacy) image it writes a firstrun.sh script instead, which is what most tutorials from 2023 to 2025 describe. On the first boot, the image:
- Expands the
ext4root file system to fill the entire capacity of your microSD card (you no longer need to runsudo raspi-config --expand-rootfsmanually). - Sets your hostname (e.g.,
rpi), locale, and timezone (Europe/Dublin). - Creates your administrative user account and
/etc/shadowpassword hash. - Passes the Wi-Fi settings through Netplan to NetworkManager, which gets a generated connection profile with a
netplan-prefix2 (on Bookworm,firstrun.shwrote the profilepreconfigured.nmconnectiondirectly). - Enables the SSH server (
ssh.service) and installs your public key in~/.ssh/authorized_keys.
Why the default pi / raspberry account was abolished
Section titled “Why the default pi / raspberry account was abolished”If you read older Raspberry Pi books or forum posts, every example logged in as user pi with the default password raspberry. In April 2022, Raspberry Pi Ltd permanently removed the default pi user.3
This change follows the direction of cybersecurity regulation (Chapter 19). In the UK, the Product Security and Telecommunications Infrastructure (PSTI) Act 2022, in force since April 2024, bans universal default passwords on consumer connectable products.4 In the EU, the cybersecurity requirements of the Radio Equipment Directive (assessed against EN 18031) have applied since August 2025 and are repealed from 11 December 2027, when the Cyber Resilience Act takes over,5 and the Cyber Resilience Act (CRA) applies in full from December 2027; the harmonised standards that products will be assessed against under the CRA are still being written by CEN, CENELEC and ETSI.6 ETSI EN 303 645 and NIST IR 8259 are guidance documents, not law, and they make the same recommendation.7
The reason is practical. In 2016 the Mirai botnet took over hundreds of thousands of cameras and routers by trying a short list of factory-default usernames and passwords over Telnet.8 In 2017 the Linux.MulDrop.14 malware targeted Raspberry Pis that had SSH open with the default pi / raspberry login.9 Requiring a unique user at imaging time (or better, disabling password logins in favour of Ed25519 SSH keys)10 removes that attack.
Five ways to connect to a headless gateway
Section titled “Five ways to connect to a headless gateway”Depending on whether you are working at home with a router, on a university enterprise Wi-Fi network (such as eduroam), or in a field cabinet with no network infrastructure at all, you have five distinct ways to reach your gateway (Table 2.5).
Table 2.5. Comparison of headless connection methods for the Raspberry Pi 4/5 and BeagleBone gateways.
| Connection Method | Physical Link | Addressing & Discovery | Best Used When… |
|---|---|---|---|
| 1. Switched Ethernet or Home/Hotspot Wi-Fi | Cat 5e/6 to router/switch, or 2.4/5 GHz Wi-Fi to router or smartphone hotspot | Router DHCP server assigns IP; discovered via mDNS (rpi.local), router DHCP table, or nmap | You control the local router or have a smartphone mobile hotspot enabled before powering the Pi. |
| 2. Direct Ethernet Cable to Laptop | Single Ethernet cable directly between laptop and Pi RJ45 (Auto-MDIX; no special crossover cable needed) | IPv6 Link-Local (fe80::... via rpi.local), or Laptop Internet Connection Sharing (ICS) / NetworkManager Shared to other computers | Working in a university lab where Wi-Fi uses 802.1X enterprise auth (eduroam) or blocks peer-to-peer client traffic (AP isolation). |
3. USB-C Ethernet Gadget (rpi-usb-gadget) | Single USB-C data cable from laptop directly into the Pi 4 / Pi 5 USB-C power/data port (or BeagleBone USB client port) | Virtual USB network adapter (usb0); mDNS rpi.local (or fixed 192.168.7.2 on BeagleBone) | Travelling with just a laptop and a single USB-C cable (provided the laptop USB-C port can supply 1.5–3.0 A). |
| 4. 3.3 V UART Serial Console | 3-wire USB-to-TTL (3.3 V) serial adapter to Header Pins 6 (GND), 8 (TXD0), 10 (RXD0) (or Pi 5 3-pin JST debug port) | No IP address required. Direct /dev/serial0 (ttyS0 on the Pi 4 header) at 115200 8N1: kernel console and agetty login prompt | The fallback when the network is down: debugging early boot failures, broken network configs, or corrupted fstab mounts. |
| 5. Outbound Tunnel (Pi Connect / WireGuard) | Any outbound internet connection (including behind NAT or 4G/5G CGNAT) | Outbound WebRTC / TLS / WireGuard VPN (100.x.y.z) without port forwarding | Reaching a remote gateway deployed in a home, farm, or campus from anywhere without exposing Port 22 to the internet. |
The five methods fail for different reasons. Figure 2.10 shows which of them still reach a Pi 4 gateway in a given situation, and the first layer at which each of the others fails.
Which connection methods still reach the gateway?
Choose a situation and any faults, then click a method for the reason and the command.
You and the Pi are on the same network, which you control. The router gives out addresses by DHCP and has a route to the internet.
Methods 1, 2, 3, 4, 5 work (5 of 5).
1. Ethernet or Wi-Fi through a router: works
The router gives the Pi an address by DHCP. Your laptop is on the same link, so mDNS resolves rpi.local and SSH connects with your key.
$ ping -4 rpi.local
$ ssh derek@rpi.local
Depends on: a router or hotspot that both machines can join, its DHCP server, mDNS on the same link, sshd, your key.
Assumed: enable_uart=1 is set, your SSH key is installed, and the tunnel daemon was signed in before any fault. Not modelled: wrong keys or passwords, firewalls, a cellular modem in the cabinet, a fault on one interface only, power faults, Tailscale SSH, and the Pi 5 debug connector.
Figure 2.10. Which of the five connection methods of Table 2.5 still reach a headless Raspberry Pi 4 gateway in a given situation and with given faults, with the first layer at which each one fails.
Try this:
- Choose Campus Wi-Fi (eduroam). Method 1 fails at the physical link, methods 2, 3 and 4 work, and the tunnel fails because the board has no outbound internet connection. Click method 5 to read what sharing the laptop’s connection would change.
- Go back to Home router or phone hotspot and tick sshd not running. Methods 1, 2 and 3 now fail at the SSH service, and the serial console still works.
- Tick Board fails early in boot. Only the serial console remains, and it shows boot messages only. Then tick No 3.3 V USB-serial adapter to hand: nothing reaches the board, which is why I keep an adapter in the lab kit.
The figure does not model wrong keys or passwords, firewalls, a fault on one interface only, or power faults.
Network discovery (mDNS) and NetworkManager (nmcli)
Section titled “Network discovery (mDNS) and NetworkManager (nmcli)”Once your gateway boots on the same local subnet as your laptop, you do not need to guess its DHCP IP address. Raspberry Pi OS runs the avahi-daemon service out of the box,12 implementing Multicast DNS (mDNS / Zeroconf, RFC 6762) on UDP port 5353.13 Any modern Windows 11, macOS, or Linux host can resolve <hostname>.local automatically:
# From PowerShell on a Windows laptop (ping -4 rpi.local also works on macOS and Linux):PS C:\Users\derek> ping -4 rpi.localPinging rpi.local [192.168.1.142] with 32 bytes of data:Reply from 192.168.1.142: bytes=32 time=2ms TTL=64(Note: If you run ping rpi.local without -4, you will often see an IPv6 link-local address starting with fe80::.... That is normal, and an advantage when connecting an Ethernet cable directly between your laptop and the Pi without a DHCP server, because IPv6 link-local addresses self-assign automatically via Stateless Address Autoconfiguration.)
Managing networks with nmcli and nmtui (Bookworm & Trixie)
Section titled “Managing networks with nmcli and nmtui (Bookworm & Trixie)”These are the nmcli commands that I use most often on a gateway:
# 1. Inspect active network interfaces and IP addresses:derek@rpi:~ $ ip -br addrlo               UNKNOWN        127.0.0.1/8 ::1/128eth0             UP             192.168.1.142/24 fe80::dea6:32ff:fe12:3456/64wlan0            UP             192.168.1.143/24 fe80::dea6:32ff:fe12:3457/64
# 2. List NetworkManager connection profiles and scan for Wi-Fi networks:derek@rpi:~ $ nmcli connection showderek@rpi:~ $ nmcli device wifi list
# 3. Connect to a new Wi-Fi network from the command line:derek@rpi:~ $ sudo nmcli device wifi connect "MyLabHotspot" password "SecretPassword123"
# 4. Set a static IPv4 address on eth0 (e.g., 192.168.1.200/24) when needed.#    Use the profile name that step 2 lists for eth0: "Wired connection 1" on#    Bookworm, or a generated name such as "netplan-eth0" on a cloud-init image.derek@rpi:~ $ sudo nmcli con mod "Wired connection 1" \    ipv4.addresses 192.168.1.200/24 \    ipv4.gateway 192.168.1.1 \    ipv4.dns "1.1.1.1 8.8.8.8" \    ipv4.method manualderek@rpi:~ $ sudo nmcli con up "Wired connection 1"
(Tip: On a home or lab router, setting a DHCP MAC address reservation on the router is usually cleaner than hardcoding a static IP on the Pi itself, because the Pi will still pick up an address cleanly if you carry it to a different network).
SSH keys, file transfer, and USB gadget networking
Section titled “SSH keys, file transfer, and USB gadget networking”Passwordless SSH with Ed25519 keys
Section titled “Passwordless SSH with Ed25519 keys”Typing a password every time you connect via SSH or copy a compiled C++ binary with scp quickly becomes tedious, and prevents automated deploy scripts or VS Code Remote-SSH from running smoothly. Generate an Ed25519 public/private key pair on your laptop (if you have not already) and install the public key onto your gateway:
# Run on your host laptop (Windows PowerShell, macOS, or Linux):$ ssh-keygen -t ed25519 -C "derek@laptop"
# Copy your public key to the gateway (Linux/macOS):$ ssh-copy-id derek@rpi.local
# Or on Windows PowerShell (one-liner):PS> type $env:USERPROFILE\.ssh\id_ed25519.pub | ssh derek@rpi.local "mkdir -p ~/.ssh && chmod 700 ~/.ssh && cat >> ~/.ssh/authorized_keys && chmod 600 ~/.ssh/authorized_keys"
Once your key is in place, ssh derek@rpi.local and scp my_sensor_app derek@rpi.local:~/ connect immediately without a password prompt.
USB gadget Ethernet (rpi-usb-gadget)
Section titled “USB gadget Ethernet (rpi-usb-gadget)”The BeagleBone Black provides “Internet-over-USB” out of the box: it appears to the laptop as a USB network adapter, with the board at 192.168.7.2, over a single USB cable.16 A Raspberry Pi 4, Pi 5, or Pi Zero 2 W can do the same through its USB-C port (the micro-USB data port on the Zero 2 W). Trixie images from October 2025 onwards include the rpi-usb-gadget package, which sets it up:17
- In Raspberry Pi Imager, turn on Enable USB Gadget Mode in the customisation settings before you write the card. On a board that is already running, use the command instead:
Terminal window derek@rpi:~ $ sudo rpi-usb-gadget onderek@rpi:~ $ sudo reboot - Connect the Pi’s USB-C port to the laptop with a USB data cable. The Pi enumerates as a USB Ethernet adapter (
usb0on the Pi side) and is reachable asrpi.local. - On Windows, install the gadget driver that Raspberry Pi provides. macOS and Linux need no driver.
Older tutorials get the same result by adding dtoverlay=dwc2 to config.txt and modules-load=dwc2,g_ether to cmdline.txt. That method still works on Bookworm, and you do not need it on Trixie.
The fallback: the 3.3 V UART serial console
Section titled “The fallback: the 3.3 V UART serial console”What if you misconfigure NetworkManager, break /etc/fstab (Section 2.8), or introduce a kernel panic during driver development (Chapter 10) so the network stack never comes up? Rather than pulling the microSD card and starting over, an embedded engineer attaches a 3.3 V USB-to-TTL Serial Cable (such as an FTDI TTL-232R-3V3 or a CP2102 / CH340G adapter set strictly to 3.3 V).
Wiring a serial console
Click a wire, the adapter, or a pin.
Ground to ground, and each side's TX to the other side's RX. The red 5 V wire is never connected.
Figure 2.11. Null-modem cross-wiring of a 3.3 V USB-to-TTL serial cable to the Raspberry Pi 40-pin header: Ground to Ground, Adapter RXD to Pi TXD (Pin 8), and Adapter TXD to Pi RXD (Pin 10). Never connect the adapter’s red (5 V) power wire.
- On the Raspberry Pi 4 (40-pin header): Enable the serial console by adding
enable_uart=1to/boot/firmware/config.txt(or enabling it under Interface Options → Serial Port insudo raspi-config). Wire GND to Pin 6, Adapter RXD to Pin 8 (GPIO14 / TXD0), and Adapter TXD to Pin 10 (GPIO15 / RXD0). Leave the adapter’s red5 Vwire disconnected and insulated. The console device is/dev/serial0, which on the Pi 4 is a link to the mini UARTttyS0(the PL011 UARTttyAMA0is connected to the Bluetooth module).18 - On the Raspberry Pi 5 (Dedicated 3-pin JST-SH Debug Connector): The Pi 5 places a dedicated 3-pin debug UART connector right between the two micro-HDMI ports (
ttyAMA10, always active at115200 8N1even before the OS boots), freeing up the 40-pin header UART completely.18
Open your serial terminal on the host PC (tio /dev/ttyUSB0, screen /dev/ttyUSB0 115200, or PuTTY on Windows at 115200 baud, 8 data bits, 1 stop bit, No parity, No flow control (8N1)) and power on the Pi. You will see the Linux kernel boot log and then a login prompt, even with no network connection. On the Pi 4 header UART, the EEPROM bootloader prints its own messages only if BOOT_UART=1 is set in the bootloader configuration (Section 2.5).19
Remote access without opening Port 22 to the internet
Section titled “Remote access without opening Port 22 to the internet”When students build their remote dashboard for Assignment 2 or a final project, a common temptation is to log into their home router and set up TCP Port Forwarding to expose the Raspberry Pi’s SSH port (22) or MQTT broker (1883) directly to the public internet (often paired with Dynamic DNS).
A deployed gateway should not need any inbound firewall port opened on its LAN. Use an outbound encrypted tunnel or a mesh VPN instead:
- Raspberry Pi Connect (
rpi-connect): An official, free service for Raspberry Pi OS. Install it withsudo apt install rpi-connect-lite, then runrpi-connect onandrpi-connect signin. The daemon makes an outbound TLS connection from your Pi. You can then open a remote shell in a browser (or a remote desktop session, with the fullrpi-connectpackage) from anywhere, over peer-to-peer WebRTC, without changing router firewall rules.21 - Tailscale or WireGuard mesh VPN: Tailscale is built on the WireGuard protocol. Installing it (
curl -fsSL https://tailscale.com/install.sh | sh && sudo tailscale up) places your laptop and your Raspberry Pi gateway on a private, encrypted overlay network (100.x.y.z) with NAT traversal.22 Port scanners on the public internet cannot see the gateway, and you can reach it by name from any network.
🧩 Knowledge Check
Section titled “🧩 Knowledge Check”Match the connection method to the situation it suits
You copy a wpa_supplicant.conf file onto the boot partition of a new Raspberry Pi OS Bookworm image, but the board never joins the Wi-Fi network. Why?
You connect a 3.3 V USB-to-TTL serial adapter to a Raspberry Pi 4 for a serial console. Which wiring is correct?
Which of the following statements about access to a headless gateway are correct?
Footnotes
Section titled “Footnotes”-
T. Dewey, “A new Raspberry Pi Imager,” Raspberry Pi News, 24 Nov. 2025. Available: raspberrypi.com/news/a-new-raspberry-pi-imager. ↩
-
P. Oberosler, “Cloud-init on Raspberry Pi OS,” Raspberry Pi News, 27 Nov. 2025. Available: raspberrypi.com/news/cloud-init-on-raspberry-pi-os. ↩ ↩2
-
S. Long, “An update to Raspberry Pi OS Bullseye,” Raspberry Pi News, Apr. 2022. Available: raspberrypi.com/news/raspberry-pi-bullseye-update-april-2022. ↩
-
Product Security and Telecommunications Infrastructure Act 2022 (c. 46), UK Parliament, Dec. 2022; and The Product Security and Telecommunications Infrastructure (Security Requirements for Relevant Connectable Products) Regulations 2023, SI 2023/1007, made 14 Sept. 2023, in force 29 Apr. 2024. Available: legislation.gov.uk/uksi/2023/1007. ↩
-
Commission Delegated Regulation (EU) 2022/30 supplementing Directive 2014/53/EU (Radio Equipment Directive), Jan. 2022, applicable from 1 Aug. 2025 (as amended by Delegated Regulation (EU) 2023/2444) and repealed from 11 Dec. 2027 by Delegated Regulation (EU) 2026/339; and Commission Implementing Decision (EU) 2025/138 of 28 Jan. 2025, which cites EN 18031-1:2024, EN 18031-2:2024 and EN 18031-3:2024 as harmonised standards, with restrictions. Available: eur-lex.europa.eu/eli/dec_impl/2025/138/oj. ↩
-
European Parliament and Council of the European Union, Regulation (EU) 2024/2847 on horizontal cybersecurity requirements for products with digital elements (Cyber Resilience Act), Official Journal of the European Union, Nov. 2024, main obligations applicable from 11 Dec. 2027; and European Commission, Implementing Decision C(2025) 618 on a standardisation request to CEN, CENELEC and ETSI in support of Regulation (EU) 2024/2847, 3 Feb. 2025, accepted by the three organisations in April 2025. See CEN-CENELEC: CRA standardization request accepted. ↩
-
ETSI, EN 303 645: Cyber Security for Consumer Internet of Things: Baseline Requirements; and M. Fagan, K. N. Megas, K. Scarfone and M. Smith, Foundational Cybersecurity Activities for IoT Device Manufacturers, NIST Interagency Report 8259, May 2020, doi:
10.6028/NIST.IR.8259. ↩ -
M. Antonakakis, T. April, M. Bailey, M. Bernhard, E. Bursztein, J. Cochran, Z. Durumeric, J. A. Halderman, L. Invernizzi, M. Kallitsis, D. Kumar, C. Lever, Z. Ma, J. Mason, D. Menscher, C. Seaman, N. Sullivan, K. Thomas and Y. Zhou, “Understanding the Mirai Botnet,” in Proc. 26th USENIX Security Symposium, Vancouver, BC, Aug. 2017, pp. 1093-1110. ↩
-
Doctor Web, “Doctor Web examines two Linux Trojans,” 5 June 2017. Available: news.drweb.com/show/?i=11320. ↩
-
B. Harris and L. Velvindron, Ed25519 and Ed448 Public Key Algorithms for the Secure Shell (SSH) Protocol, RFC 8709, IETF, Feb. 2020. Available: rfc-editor.org/rfc/rfc8709. ↩
-
eduroam, “eduroam now available in 101 countries.” Available: eduroam.org/eduroam-now-available-in-101-countries. ↩
-
S. Cheshire and M. Krochmal, Multicast DNS, RFC 6762, IETF, Feb. 2013. Available: rfc-editor.org/rfc/rfc6762. ↩
-
S. Long, “Bookworm: the new version of Raspberry Pi OS,” Raspberry Pi News, Oct. 2023. Available: raspberrypi.com/news/bookworm-the-new-version-of-raspberry-pi-os. ↩
-
NetworkManager project, nmcli: NetworkManager Reference Manual. Available: networkmanager.dev/docs/api/latest/nmcli.html. ↩
-
BeagleBoard.org Foundation, Getting Started Guide, BeagleBoard Documentation. Available: docs.beagleboard.io/intro/support/getting-started.html. ↩
-
P. Oberosler, “USB gadget mode in Raspberry Pi OS: SSH over USB,” Raspberry Pi News, 21 Jan. 2026. Available: raspberrypi.com/news/usb-gadget-mode-in-raspberry-pi-os-ssh-over-usb. ↩
-
Raspberry Pi Ltd, “Configure UARTs,” Configuration, Raspberry Pi Documentation. Available: raspberrypi.com/documentation/computers/configuration.html. ↩ ↩2
-
Raspberry Pi Ltd, “Raspberry Pi bootloader configuration,” Raspberry Pi computer hardware, Raspberry Pi Documentation. Available: raspberrypi.com/documentation/computers/raspberry-pi.html. ↩
-
J. Weil, V. Kuarsingh, C. Donley, C. Liljenstolpe and M. Azinger, IANA-Reserved IPv4 Prefix for Shared Address Space, RFC 6598, IETF, Apr. 2012. Available: rfc-editor.org/rfc/rfc6598. ↩
-
Raspberry Pi Ltd, Raspberry Pi Connect, Raspberry Pi Documentation (Introduction, and Security and privacy). Available: raspberrypi.com/documentation/services/connect.html. ↩
-
D. Anderson, “How NAT traversal works,” Tailscale blog, 21 Aug. 2020, available: tailscale.com/blog/how-nat-traversal-works; and Tailscale, What are these 100.x.y.z addresses?, available: tailscale.com/kb/1015/100.x-addresses. ↩
© 2026 Derek Molloy, Dublin City University. All rights reserved.