
🦀Tutorial: Rust GUIs

Rust GUI Tutorial: Building an Edge Device Dashboard with egui
Section titled “Rust GUI Tutorial: Building an Edge Device Dashboard with egui”Welcome! This tutorial will guide you through building a graphical user interface (GUI) in Rust using egui and its “native” runner, eframe. egui is an immediate-mode GUI library that is easy to use, highly portable, and very efficient, making it a perfect fit for building dashboards and tools for edge devices. We’ll build a Edge Device Monitor step-by-step.
This tutorial assumes a basic understanding of Rust (structs, impl blocks, Vec, enums) and that cargo is set up. We carry the Edge Programming theme forward in this tutorial by creating a simple dashboard for monitoring a fictional edge device.
Good luck!
Question 0. Preparation and Setup
Section titled “Question 0. Preparation and Setup”First create a new project using the VSCode IDE and then use the **cargo **tool to create a new project, for example, in the c:\ directory.
Use the terminal in this directory to create a project for the tutorial — for example:
cargo new een1097_tutorial4cd een1097_tutorial4cargo add eframeOpen the folder in VSCode and you should see the following:
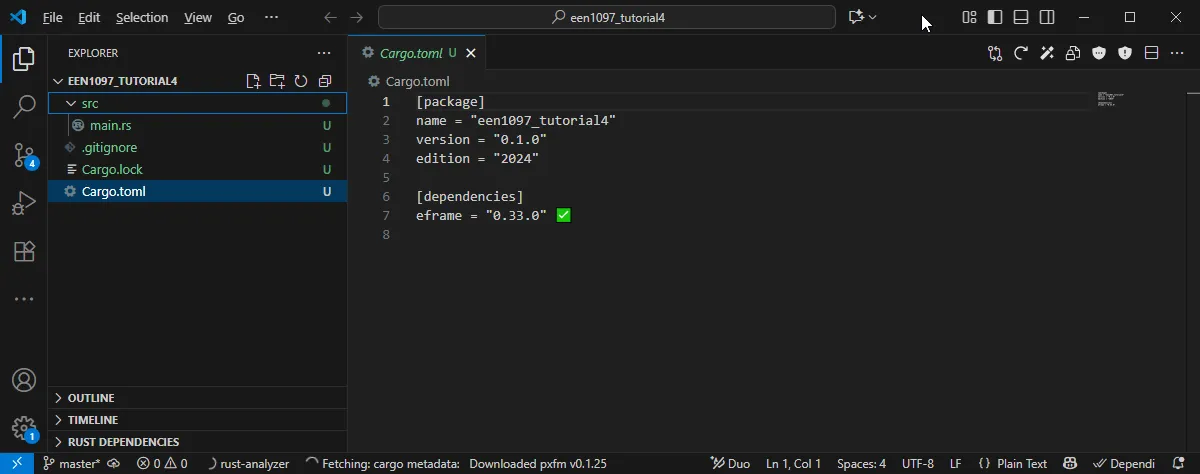
(Note: You may have a newer version of eframe than in this image (0.33.0), which may introduce some differences between my video solution and the code you need to write for the latest version. Version 0.x.x means that it will be in a constant state of change.)
The code in this tutorial has been updated for eframe 0.37.0, which is what cargo add eframe installs at the time of writing (November 2026). It needs Rust 1.95 or newer, so run rustup update stable first if your toolchain is older. The main difference from the 0.33 screenshot and video is that eframe 0.34 renamed the update() method to ui(), which receives a &mut egui::Ui instead of a &egui::Context, and replaced SidePanel/TopBottomPanel with a single Panel type. If you want to follow the video exactly, use cargo add eframe@0.33 and cargo add egui_plot@0.34 instead. The table in section 9.2 lists the changes.
Question 1. Your First egui Window
Section titled “Question 1. Your First egui Window”How do you create the most basic “Hello, World!” application with egui? This involves setting up the main application struct, implementing the eframe::App trait, and running the application. Begin by replace the contents of your src/main.rs with this starting code example:
use eframe::egui;
// 1. Define a struct for our application statestruct EdgeApp;
// 2. Implement the eframe::App trait for our structimpl eframe::App for EdgeApp {    // 3. The ui method is called on every frame    fn ui(&mut self, ui: &mut egui::Ui, _frame: &mut eframe::Frame) {        // 4. Show a "CentralPanel" which fills the entire window        egui::CentralPanel::default().show(ui, |ui| {            // 5. Add a simple label to the UI            ui.heading("Hello EEN1097!");        });    }}
fn main() -> Result<(), eframe::Error> {    // 6. Configure the native window options    // Configure native window options    let options = eframe::NativeOptions {        viewport: egui::ViewportBuilder::default()            .with_inner_size(egui::vec2(400.0, 200.0))            .with_resizable(false),        ..Default::default()    };
    // 7. Run the native application    eframe::run_native(        "Hello egui", // Window title        options,        Box::new(|_cc| Ok(Box::new(EdgeApp))), // Create and box our app state    )}
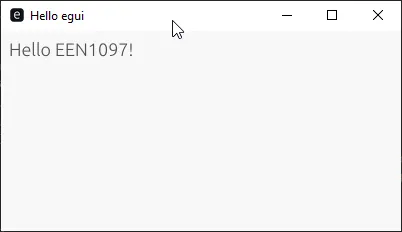
When run, the window should appear as in Figure Q1a. The code works as follows:
EdgeAppis our application’s state. For now, it’s empty.- We implement the
eframe::Apptrait, which requires auimethod (previouslyupdate). - The
uimethod is where all GUI logic goes. It’s called for every frame (e.g., 60 times per second). egui::CentralPanel::default().show(ui, |ui| ...)is the standard way to create a main panel that fills the window (previously.show(ctx, ...)).ui.heading(...)is a widget. We add it to theui(User Interface) provided by the panel’s closure.eframe::run_nativestarts the application and opens a window.
**Tasks: **Use the documentation for egui provided at: Docs.rs to adapt the provided code as follows:
- Change the panel text to “EEN1097 Edge Dashboard Panel”
- Change the window title to be “EEN1097 Edge Dashboard”
- The Heading text in this example is added by using the
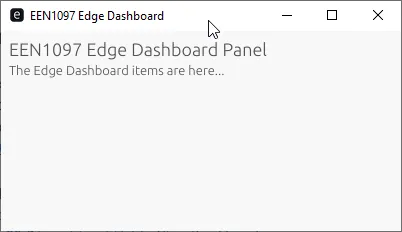
ui.heading()function, which is described here. Use the documentation to add aui.label()(scroll down in the left-hand column of the documentation) underneath the heading so that the interface now looks like Figure Q1b below:
Show solution
The heading and the window title are set in different places: the heading is a widget inside the panel, and the title is the first argument of run_native(). ui.label() adds a line of plain text below the widget before it.
use eframe::egui;
struct EdgeApp;
impl eframe::App for EdgeApp {    fn ui(&mut self, ui: &mut egui::Ui, _frame: &mut eframe::Frame) {        egui::CentralPanel::default().show(ui, |ui| {            ui.heading("EEN1097 Edge Dashboard Panel"); // Task 1            ui.label("The Edge Dashboard items are here..."); // Task 3        });    }}
fn main() -> Result<(), eframe::Error> {    let options = eframe::NativeOptions {        viewport: egui::ViewportBuilder::default()            .with_inner_size(egui::vec2(400.0, 200.0))            .with_resizable(false),        ..Default::default()    };
    eframe::run_native(        "EEN1097 Edge Dashboard", // Task 2: the window title        options,        Box::new(|_cc| Ok(Box::new(EdgeApp))),    )}
Question 2. State and Buttons
Section titled “Question 2. State and Buttons”GUIs are all about state. In this question we examine how you store application state (like a counter) and add a Button to modify it?
Modify EdgeApp to hold a counter and add a Button to increment it. Perform the following steps:
- Add an integer field to the
EdgeAppstruct to hold the number of ping counts calledping_count - Add a “default” constructor that sets the initial value to
0. Use an implementation of theDefaulttrait for your struct (run_nativeuses this to create the initial app state.)
impl Default for EdgeApp { fn default() -> Self { Self { ping_count: 0 } }}- Use the documentation to add a
ui.buttonthat when clicked increases the ping count by 1. - Use a label to display the current ping count, as illustrated in Figure Q2.
Note: to invoke the Default trait we modify the final line of the run_native call as follows:
eframe::run_native( "EEN1097 Edge Dashboard", // Window title options, Box::new(|_cc| Ok(Box::new(EdgeApp::default()))), )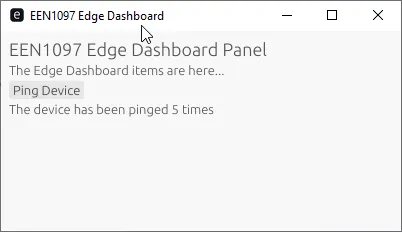
Show solution
ui.button() returns a Response, and its clicked() is true only on the frame in which the button was pressed, so the count goes up once per click. egui is immediate mode, so the label is rebuilt from self.ping_count on every frame and always shows the current value. There is no callback to update it.
use eframe::egui;
struct EdgeApp {    ping_count: u32,}
impl Default for EdgeApp {    fn default() -> Self {        Self { ping_count: 0 }    }}
impl eframe::App for EdgeApp {    fn ui(&mut self, ui: &mut egui::Ui, _frame: &mut eframe::Frame) {        egui::CentralPanel::default().show(ui, |ui| {            ui.heading("EEN1097 Edge Dashboard Panel");            ui.label("The Edge Dashboard items are here...");
            // clicked() is true only on the frame in which the button was pressed            if ui.button("Ping Device").clicked() {                self.ping_count += 1;            }            ui.label(format!("The device has been pinged {} times", self.ping_count));        });    }}
fn main() -> Result<(), eframe::Error> {    let options = eframe::NativeOptions {        viewport: egui::ViewportBuilder::default()            .with_inner_size(egui::vec2(400.0, 200.0))            .with_resizable(false),        ..Default::default()    };
    eframe::run_native(        "EEN1097 Edge Dashboard",        options,        Box::new(|_cc| Ok(Box::new(EdgeApp::default()))),    )}
Question 3. Text Input and Responding
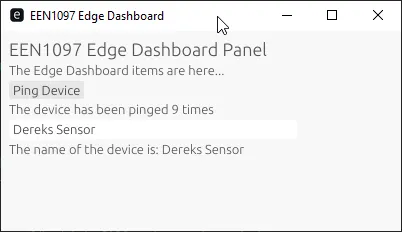
Section titled “Question 3. Text Input and Responding”The next question examines how we can get text input from a user. Complete the following steps to develop an interface as illustrated in Figure Q3:
- Adapt the
EdgeAppstruct to add adevice_namefield as aString. Modify theDefaultimplementation so that the default value is set to “Default Name”. - Modify the
EdgeAppto add aTextEditwidget to let the user set a name for the edge device, which is then displayed within a formatted label.
Show solution
TextEdit::singleline() takes a mutable reference to the String and edits it in place, so the label on the next line shows the new name in the same frame. ui.text_edit_singleline(&mut self.device_name) is a shorter way to add the same widget.
use eframe::egui;
struct EdgeApp {    ping_count: u32,    device_name: String,}
impl Default for EdgeApp {    fn default() -> Self {        Self {            ping_count: 0,            device_name: "Default Name".to_owned(),        }    }}
impl eframe::App for EdgeApp {    fn ui(&mut self, ui: &mut egui::Ui, _frame: &mut eframe::Frame) {        egui::CentralPanel::default().show(ui, |ui| {            ui.heading("EEN1097 Edge Dashboard Panel");            ui.label("The Edge Dashboard items are here...");
            if ui.button("Ping Device").clicked() {                self.ping_count += 1;            }            ui.label(format!("The device has been pinged {} times", self.ping_count));
            // The TextEdit borrows the String mutably and edits it in place            ui.add(egui::TextEdit::singleline(&mut self.device_name));            ui.label(format!("The name of the device is: {}", self.device_name));        });    }}
fn main() -> Result<(), eframe::Error> {    let options = eframe::NativeOptions {        viewport: egui::ViewportBuilder::default()            .with_inner_size(egui::vec2(400.0, 200.0))            .with_resizable(false),        ..Default::default()    };
    eframe::run_native(        "EEN1097 Edge Dashboard",        options,        Box::new(|_cc| Ok(Box::new(EdgeApp::default()))),    )}
Question 4. Basic Layout with ui.horizontal
Section titled “Question 4. Basic Layout with ui.horizontal”In this question you investigate how to arrange widgets side-by-side. Use ui.horizontal to place a label and its corresponding widget on the same line, creating a simple form.
- Add a
ui.separatorto add some vertical space as per Figure Q4. - Use the
ui.horizontallayout to place the ping device button beside the message using the following example code:
ui.horizontal(|ui| { ui.label("Same"); ui.label("row");});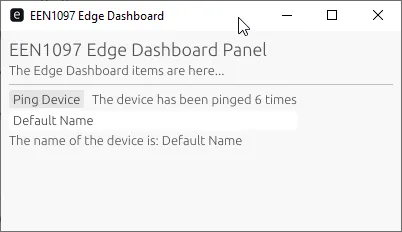
Show solution
Widgets inside the ui.horizontal() closure are laid out left to right. Everything outside it is still laid out top to bottom.
use eframe::egui;
struct EdgeApp {    ping_count: u32,    device_name: String,}
impl Default for EdgeApp {    fn default() -> Self {        Self {            ping_count: 0,            device_name: "Default Name".to_owned(),        }    }}
impl eframe::App for EdgeApp {    fn ui(&mut self, ui: &mut egui::Ui, _frame: &mut eframe::Frame) {        egui::CentralPanel::default().show(ui, |ui| {            ui.heading("EEN1097 Edge Dashboard Panel");            ui.label("The Edge Dashboard items are here...");            ui.separator(); // Task 1
            // Task 2: the button and its message on the same row            ui.horizontal(|ui| {                if ui.button("Ping Device").clicked() {                    self.ping_count += 1;                }                ui.label(format!("The device has been pinged {} times", self.ping_count));            });
            ui.add(egui::TextEdit::singleline(&mut self.device_name));            ui.label(format!("The name of the device is: {}", self.device_name));        });    }}
fn main() -> Result<(), eframe::Error> {    let options = eframe::NativeOptions {        viewport: egui::ViewportBuilder::default()            .with_inner_size(egui::vec2(400.0, 200.0))            .with_resizable(false),        ..Default::default()    };
    eframe::run_native(        "EEN1097 Edge Dashboard",        options,        Box::new(|_cc| Ok(Box::new(EdgeApp::default()))),    )}
Question 5. Using Panels
Section titled “Question 5. Using Panels”In this section we examine how you create more complex layouts, like a sidebar for navigation and a main area for content.
- Create a side panel on the left using
egui::Panel::left("settings")that has the heading “Settings” in which we will place a “Device Name” label and the edit field. (egui::Panel::leftreplacesegui::SidePanel::leftfrom eframe 0.34. Like the central panel, call.show(ui, |ui| { ... })on it, and add it before theCentralPanel.) - Place the Device Monitor in a
egui::CentralPanel. - Tidy up the spacing so that it looks like Figure Q5b. Use
.default_size()on the panel to set its starting width in points (e.g.,egui::Panel::left("settings").default_size(150.0)), orui.set_width()inside it, which also takes a width in points (the previous edition of this question described it, incorrectly, as taking a normalised fraction such as 0.3). Please review the expected outcome in Figure Q5b.
Show solution
The side panel must be added before the CentralPanel, because the central panel takes whatever space is left. The text field moves into the side panel, and the label that displays the name stays in the central panel. default_size(95.0) is a starting width in points that fits “Settings” on one line; the panel is resizable by default, so you can still drag its edge.
use eframe::egui;
struct EdgeApp {    ping_count: u32,    device_name: String,}
impl Default for EdgeApp {    fn default() -> Self {        Self {            ping_count: 0,            device_name: "Default Name".to_owned(),        }    }}
impl eframe::App for EdgeApp {    fn ui(&mut self, ui: &mut egui::Ui, _frame: &mut eframe::Frame) {        // Task 1: the side panel is added first, so it takes its space        // before the central panel fills what is left        egui::Panel::left("settings")            .default_size(95.0) // Task 3: starting width in points            .show(ui, |ui| {                ui.heading("Settings");                ui.separator();                ui.label("Device Name:");                ui.add(egui::TextEdit::singleline(&mut self.device_name));            });
        // Task 2: the device monitor in the central panel        egui::CentralPanel::default().show(ui, |ui| {            ui.heading("EEN1097 Edge Dashboard Panel");            ui.label("The Edge Dashboard items are here...");            ui.separator();
            ui.horizontal(|ui| {                if ui.button("Ping Device").clicked() {                    self.ping_count += 1;                }                ui.label(format!("The device has been pinged {} times", self.ping_count));            });
            ui.label(format!("The name of the device is: {}", self.device_name));        });    }}
fn main() -> Result<(), eframe::Error> {    let options = eframe::NativeOptions {        viewport: egui::ViewportBuilder::default()            .with_inner_size(egui::vec2(400.0, 200.0))            .with_resizable(false),        ..Default::default()    };
    eframe::run_native(        "EEN1097 Edge Dashboard",        options,        Box::new(|_cc| Ok(Box::new(EdgeApp::default()))),    )}
Question 6. Responding to Widgets
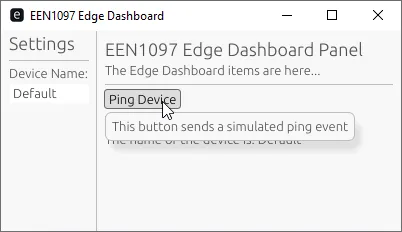
Section titled “Question 6. Responding to Widgets”In this question we examine how you can build GUIs that react to more than just clicks. Most widget methods return a Response object. Use this to show a Tooltip when the user hovers over the “Ping Device” button.
- Change the Ping Button so that it is an instance of
ui.button. For example,let ping_button = ui.button()... - Use the
on_hover_text()function to display the output in Figure Q6.
Show solution
Most widgets return a Response. on_hover_text() takes the Response and returns it, so it can be chained onto ui.button() and the result kept in ping_button for the click check.
use eframe::egui;
struct EdgeApp {    ping_count: u32,    device_name: String,}
impl Default for EdgeApp {    fn default() -> Self {        Self {            ping_count: 0,            device_name: "Default Name".to_owned(),        }    }}
impl eframe::App for EdgeApp {    fn ui(&mut self, ui: &mut egui::Ui, _frame: &mut eframe::Frame) {        egui::Panel::left("settings")            .default_size(95.0)            .show(ui, |ui| {                ui.heading("Settings");                ui.separator();                ui.label("Device Name:");                ui.add(egui::TextEdit::singleline(&mut self.device_name));            });
        egui::CentralPanel::default().show(ui, |ui| {            ui.heading("EEN1097 Edge Dashboard Panel");            ui.label("The Edge Dashboard items are here...");            ui.separator();
            ui.horizontal(|ui| {                // Task 1: keep the Response that the button returns.                // Task 2: on_hover_text() takes the Response and returns it,                // so it can be chained before the click is checked.                let ping_button = ui                    .button("Ping Device")                    .on_hover_text("This button sends a simulated ping event");                if ping_button.clicked() {                    self.ping_count += 1;                }                ui.label(format!("The device has been pinged {} times", self.ping_count));            });
            ui.label(format!("The name of the device is: {}", self.device_name));        });    }}
fn main() -> Result<(), eframe::Error> {    let options = eframe::NativeOptions {        viewport: egui::ViewportBuilder::default()            .with_inner_size(egui::vec2(400.0, 200.0))            .with_resizable(false),        ..Default::default()    };
    eframe::run_native(        "EEN1097 Edge Dashboard",        options,        Box::new(|_cc| Ok(Box::new(EdgeApp::default()))),    )}
Question 7. Sliders and Data Binding
Section titled “Question 7. Sliders and Data Binding”A common task is setting numerical parameters. How do you use a Slider to control a value in your state? Add a slider to control a “Refresh Rate” for your device.
- Add a
refresh_ratefield to theEdgeAppstruct as af32and ensure that it is set to1.0by default, as illustrated in Figure Q7. - Add an
egui::Sliderto your interface with the range0.1..=10.0using the documentation at: https://docs.rs/egui/latest/egui/widgets/struct.Slider.html and use the.text()element to add a description to the slider. - Add a label that displays the Refresh Rate as defined by the slider value, as illustrated in Figure Q7.
Show solution
Slider::new() takes a mutable reference to the value and a range, and writes the new value back while the slider is dragged. {:.1} formats the f32 to one decimal place.
use eframe::egui;
struct EdgeApp {    ping_count: u32,    device_name: String,    refresh_rate: f32,}
impl Default for EdgeApp {    fn default() -> Self {        Self {            ping_count: 0,            device_name: "Default Name".to_owned(),            refresh_rate: 1.0, // Task 1        }    }}
impl eframe::App for EdgeApp {    fn ui(&mut self, ui: &mut egui::Ui, _frame: &mut eframe::Frame) {        egui::Panel::left("settings")            .default_size(95.0)            .show(ui, |ui| {                ui.heading("Settings");                ui.separator();                ui.label("Device Name:");                ui.add(egui::TextEdit::singleline(&mut self.device_name));            });
        egui::CentralPanel::default().show(ui, |ui| {            ui.heading("EEN1097 Edge Dashboard Panel");            ui.label("The Edge Dashboard items are here...");            ui.separator();
            ui.horizontal(|ui| {                let ping_button = ui                    .button("Ping Device")                    .on_hover_text("This button sends a simulated ping event");                if ping_button.clicked() {                    self.ping_count += 1;                }                ui.label(format!("The device has been pinged {} times", self.ping_count));            });
            ui.label(format!("The name of the device is: {}", self.device_name));
            // Task 2: the slider writes straight into self.refresh_rate            ui.add(egui::Slider::new(&mut self.refresh_rate, 0.1..=10.0).text("Refresh Rate (Hz)"));            // Task 3: {:.1} prints one decimal place            ui.label(format!("Current refresh rate is {:.1} Hz", self.refresh_rate));        });    }}
fn main() -> Result<(), eframe::Error> {    let options = eframe::NativeOptions {        viewport: egui::ViewportBuilder::default()            .with_inner_size(egui::vec2(400.0, 200.0))            .with_resizable(false),        ..Default::default()    };
    eframe::run_native(        "EEN1097 Edge Dashboard",        options,        Box::new(|_cc| Ok(Box::new(EdgeApp::default()))),    )}
Question 8. Enums and ComboBox
Section titled “Question 8. Enums and ComboBox”This question examines how you let a user choose from a fixed set of options. This is a perfect use case for a Rust enum and an egui::ComboBox which is described in the documentation here.
- Add a
DeviceModeenum and add three states “Idle”, “Active”, and “Error”. Please add the following line in front of the enum to allow for comparison#[derive(Debug, PartialEq)] - Add a
modefield to yourEdgeAppstruct that is aDeviceModethat defaults to Idle. - Add a “Device Mode” setting to the GUI using the
egui::ComboBoxas described in the linked website above.
The final outcome should function as illustrated in Figure Q8.
egui::ComboBox
Show solution
selectable_value() sets self.mode to its value when that entry is clicked, and uses PartialEq to mark the entry that matches the current mode. selected_text() uses Debug to print the current mode in the closed box. ComboBox::from_label() places the label to the right of the box, as in Figure Q8.
use eframe::egui;
// Task 1: PartialEq lets selectable_value() compare modes,// and Debug lets format!("{:?}") print the current one#[derive(Debug, PartialEq)]enum DeviceMode {    Idle,    Active,    Error,}
struct EdgeApp {    ping_count: u32,    device_name: String,    refresh_rate: f32,    mode: DeviceMode, // Task 2}
impl Default for EdgeApp {    fn default() -> Self {        Self {            ping_count: 0,            device_name: "Default Name".to_owned(),            refresh_rate: 1.0,            mode: DeviceMode::Idle,        }    }}
impl eframe::App for EdgeApp {    fn ui(&mut self, ui: &mut egui::Ui, _frame: &mut eframe::Frame) {        egui::Panel::left("settings")            .default_size(95.0)            .show(ui, |ui| {                ui.heading("Settings");                ui.separator();                ui.label("Device Name:");                ui.add(egui::TextEdit::singleline(&mut self.device_name));            });
        egui::CentralPanel::default().show(ui, |ui| {            ui.heading("EEN1097 Edge Dashboard Panel");            ui.label("The Edge Dashboard items are here...");            ui.separator();
            ui.horizontal(|ui| {                let ping_button = ui                    .button("Ping Device")                    .on_hover_text("This button sends a simulated ping event");                if ping_button.clicked() {                    self.ping_count += 1;                }                ui.label(format!("The device has been pinged {} times", self.ping_count));            });
            ui.label(format!("The name of the device is: {}", self.device_name));
            ui.add(egui::Slider::new(&mut self.refresh_rate, 0.1..=10.0).text("Refresh Rate (Hz)"));            ui.label(format!("Current refresh rate is {:.1} Hz", self.refresh_rate));
            // Task 3: each selectable_value() sets self.mode to its value when clicked            egui::ComboBox::from_label("Select the Device Mode:")                .selected_text(format!("{:?}", self.mode))                .show_ui(ui, |ui| {                    ui.selectable_value(&mut self.mode, DeviceMode::Idle, "Idle");                    ui.selectable_value(&mut self.mode, DeviceMode::Active, "Active");                    ui.selectable_value(&mut self.mode, DeviceMode::Error, "Error");                });        });    }}
fn main() -> Result<(), eframe::Error> {    let options = eframe::NativeOptions {        viewport: egui::ViewportBuilder::default()            .with_inner_size(egui::vec2(400.0, 200.0))            .with_resizable(false),        ..Default::default()    };
eframe::run_native( "EEN1097 Edge Dashboard", options, Box::new(|_cc| Ok(Box::new(EdgeApp::default()))), )}Question 9. Basic Plotting with egui_plot
Section titled “Question 9. Basic Plotting with egui_plot”We now want to add a graph to the dashboard by adding a simple, static line plot. The egui_plot module can do this. Let’s plot some sample “historical data.” as illustrated in Figure Q9
egui_plot
- Modify the
Cargo.tomlfile to add the plot feature by using cargo as follows:
cargo add egui_plotCheck that Cargo.toml now lists egui_plot = "0.38.0" alongside eframe = "0.37.0". The egui_plot version number is one ahead of eframe, and a mismatched pair fails to compile (see the version table in section 9.4).
- Add the following line to the top of your
main.rsfile.
use egui_plot::{Line, Plot, PlotPoints};- Add a
separator()and then some sample data as follows:
let historical_data: PlotPoints = vec![ [0.0, 1.0], [1.0, 3.0], [2.0, 2.0], [3.0, 4.0], [4.0, 3.5], ].into();- Build a line from the data plot points as follows ( the series name is now the first argument of
Line::new(), replacing the.name()call):
let line = Line::new("Temp degC", historical_data) .color(Color32::from_rgb(100, 200, 100));- Then render the plot widget:
Plot::new("device_plot") .height(200.0) .show(ui, |plot_ui| { plot_ui.line(line); });Show solution
The code from steps 3 to 5 goes at the end of the CentralPanel closure. Color32 is imported with egui at the top of the file (use eframe::egui::{self, Color32};); writing egui::Color32 in full works too. The window is now 420 points tall so the 200-point plot fits, because with_resizable(false) stops the user enlarging it.
use eframe::egui::{self, Color32};use egui_plot::{Line, Plot, PlotPoints};
#[derive(Debug, PartialEq)]enum DeviceMode {    Idle,    Active,    Error,}
struct EdgeApp {    ping_count: u32,    device_name: String,    refresh_rate: f32,    mode: DeviceMode,}
impl Default for EdgeApp {    fn default() -> Self {        Self {            ping_count: 0,            device_name: "Default Name".to_owned(),            refresh_rate: 1.0,            mode: DeviceMode::Idle,        }    }}
impl eframe::App for EdgeApp {    fn ui(&mut self, ui: &mut egui::Ui, _frame: &mut eframe::Frame) {        egui::Panel::left("settings")            .default_size(95.0)            .show(ui, |ui| {                ui.heading("Settings");                ui.separator();                ui.label("Device Name:");                ui.add(egui::TextEdit::singleline(&mut self.device_name));            });
        egui::CentralPanel::default().show(ui, |ui| {            ui.heading("EEN1097 Edge Dashboard Panel");            ui.label("The Edge Dashboard items are here...");            ui.separator();
            ui.horizontal(|ui| {                let ping_button = ui                    .button("Ping Device")                    .on_hover_text("This button sends a simulated ping event");                if ping_button.clicked() {                    self.ping_count += 1;                }                ui.label(format!("The device has been pinged {} times", self.ping_count));            });
            ui.label(format!("The name of the device is: {}", self.device_name));
            ui.add(egui::Slider::new(&mut self.refresh_rate, 0.1..=10.0).text("Refresh Rate (Hz)"));            ui.label(format!("Current refresh rate is {:.1} Hz", self.refresh_rate));
            egui::ComboBox::from_label("Select the Device Mode:")                .selected_text(format!("{:?}", self.mode))                .show_ui(ui, |ui| {                    ui.selectable_value(&mut self.mode, DeviceMode::Idle, "Idle");                    ui.selectable_value(&mut self.mode, DeviceMode::Active, "Active");                    ui.selectable_value(&mut self.mode, DeviceMode::Error, "Error");                });
            // Question 9: a static line plot            ui.separator();            let historical_data: PlotPoints = vec![                [0.0, 1.0], [1.0, 3.0], [2.0, 2.0], [3.0, 4.0], [4.0, 3.5],            ].into();            let line = Line::new("Temp degC", historical_data)                .color(Color32::from_rgb(100, 200, 100));            Plot::new("device_plot")                .height(200.0)                .show(ui, |plot_ui| { plot_ui.line(line); });        });    }}
fn main() -> Result<(), eframe::Error> {    let options = eframe::NativeOptions {        viewport: egui::ViewportBuilder::default()            .with_inner_size(egui::vec2(400.0, 420.0)) // taller, to fit the plot            .with_resizable(false),        ..Default::default()    };
    eframe::run_native(        "EEN1097 Edge Dashboard",        options,        Box::new(|_cc| Ok(Box::new(EdgeApp::default()))),    )}
Question 10. Custom Graphics with egui::Painter
Section titled “Question 10. Custom Graphics with egui::Painter”As seen in Question 9, egui_plot is great for plotting linear data, but what if you want to draw custom graphics, like a live custom dashboard indicator? This requires using the Painter API to draw shapes directly. In this question you will generate a custom indicator that reacts to the Refresh Rate slider. The final version should look like Figure Q10.
egui::Painter
- Remove the new code from Question 9 to display the data using
egui_plot - The interface is becoming very ‘busy’ so we will write a new function and call this from the
ui()method (previouslyupdate()). - You are provided with the following code which should not be placed inside any other implementation blocks:
impl EdgeApp {    /// Draws a custom horizontal bar (0-10 Hz) below the current interface.    fn draw_refresh_rate_bar(&self, ui: &mut egui::Ui) {        use egui::{Color32, Pos2, Rect, Vec2, CornerRadius};
        ui.add_space(8.0);        ui.heading("Refresh Rate Indicator");        ui.label("Displays 0.0-10.0 Hz");
        // Reserve an area to paint into.        let desired_size = Vec2::new(ui.available_width(), 60.0);        let (response, painter) = ui.allocate_painter(desired_size,                  egui::Sense::hover());
        // The rectangle for our bar background.        let rect = response.rect;        let rounding = CornerRadius::same(8);
        // Background        painter.rect_filled(rect, rounding, Color32::from_gray(32));
        // Compute fill proportion (0.0-1.0)        let proportion = (self.refresh_rate / 10.0).clamp(0.0, 1.0);
        // Inner padding        let pad = 6.0;        let inner = Rect::from_min_max(            Pos2::new(rect.min.x + pad, rect.min.y + pad),            Pos2::new(rect.max.x - pad, rect.max.y - pad),        );
        // Filled width        let fill_w = inner.width() * proportion;        let fill_rect = Rect::from_min_max(            inner.min,            Pos2::new(inner.min.x + fill_w, inner.max.y),        );
        // Fill and outline        painter.rect_filled(fill_rect, CornerRadius::same(6),                            Color32::from_rgb(80, 180, 120));
// Overlay the current value as text let value_text = format!("Missing Code"); painter.text( inner.center(), egui::Align2::CENTER_CENTER, value_text, egui::FontId::proportional(14.0), Color32::WHITE, ); }}- Fix the “Missing Code” formatted string to function as per Figure Q10.
- Add a
separatorand call this code from inside yourCentralPanelclosure in theui()method usingself.draw_refresh_rate_bar(ui);
Show solution
The missing line is format!("Current: {:.1} Hz", self.refresh_rate). The plot code and the use egui_plot line are removed (the egui_plot dependency can stay in Cargo.toml), and Color32 goes back to the use line inside draw_refresh_rate_bar(), so nothing is imported twice. The window is 300 points tall to fit the indicator.
use eframe::egui;
#[derive(Debug, PartialEq)]enum DeviceMode {    Idle,    Active,    Error,}
struct EdgeApp {    ping_count: u32,    device_name: String,    refresh_rate: f32,    mode: DeviceMode,}
impl Default for EdgeApp {    fn default() -> Self {        Self {            ping_count: 0,            device_name: "Default Name".to_owned(),            refresh_rate: 1.0,            mode: DeviceMode::Idle,        }    }}
impl EdgeApp {    /// Draws a custom horizontal bar (0-10 Hz) below the current interface.    fn draw_refresh_rate_bar(&self, ui: &mut egui::Ui) {        use egui::{Color32, Pos2, Rect, Vec2, CornerRadius};
        ui.add_space(8.0);        ui.heading("Refresh Rate Indicator");        ui.label("Displays 0.0-10.0 Hz");
        // Reserve an area to paint into.        let desired_size = Vec2::new(ui.available_width(), 60.0);        let (response, painter) = ui.allocate_painter(desired_size,                  egui::Sense::hover());
        // The rectangle for our bar background.        let rect = response.rect;        let rounding = CornerRadius::same(8);
        // Background        painter.rect_filled(rect, rounding, Color32::from_gray(32));
        // Compute fill proportion (0.0-1.0)        let proportion = (self.refresh_rate / 10.0).clamp(0.0, 1.0);
        // Inner padding        let pad = 6.0;        let inner = Rect::from_min_max(            Pos2::new(rect.min.x + pad, rect.min.y + pad),            Pos2::new(rect.max.x - pad, rect.max.y - pad),        );
        // Filled width        let fill_w = inner.width() * proportion;        let fill_rect = Rect::from_min_max(            inner.min,            Pos2::new(inner.min.x + fill_w, inner.max.y),        );
        // Fill and outline        painter.rect_filled(fill_rect, CornerRadius::same(6),                            Color32::from_rgb(80, 180, 120));
        // Task 4: overlay the current value as text, to one decimal place        let value_text = format!("Current: {:.1} Hz", self.refresh_rate);        painter.text(            inner.center(),            egui::Align2::CENTER_CENTER,            value_text,            egui::FontId::proportional(14.0),            Color32::WHITE,        );    }}
impl eframe::App for EdgeApp {    fn ui(&mut self, ui: &mut egui::Ui, _frame: &mut eframe::Frame) {        egui::Panel::left("settings")            .default_size(95.0)            .show(ui, |ui| {                ui.heading("Settings");                ui.separator();                ui.label("Device Name:");                ui.add(egui::TextEdit::singleline(&mut self.device_name));            });
        egui::CentralPanel::default().show(ui, |ui| {            ui.heading("EEN1097 Edge Dashboard Panel");            ui.label("The Edge Dashboard items are here...");            ui.separator();
            ui.horizontal(|ui| {                let ping_button = ui                    .button("Ping Device")                    .on_hover_text("This button sends a simulated ping event");                if ping_button.clicked() {                    self.ping_count += 1;                }                ui.label(format!("The device has been pinged {} times", self.ping_count));            });
            ui.label(format!("The name of the device is: {}", self.device_name));
            ui.add(egui::Slider::new(&mut self.refresh_rate, 0.1..=10.0).text("Refresh Rate (Hz)"));            ui.label(format!("Current refresh rate is {:.1} Hz", self.refresh_rate));
            egui::ComboBox::from_label("Select the Device Mode:")                .selected_text(format!("{:?}", self.mode))                .show_ui(ui, |ui| {                    ui.selectable_value(&mut self.mode, DeviceMode::Idle, "Idle");                    ui.selectable_value(&mut self.mode, DeviceMode::Active, "Active");                    ui.selectable_value(&mut self.mode, DeviceMode::Error, "Error");                });
            // Task 5            ui.separator();            self.draw_refresh_rate_bar(ui);        });    }}
fn main() -> Result<(), eframe::Error> {    let options = eframe::NativeOptions {        viewport: egui::ViewportBuilder::default()            .with_inner_size(egui::vec2(400.0, 300.0)) // taller, to fit the indicator            .with_resizable(false),        ..Default::default()    };
    eframe::run_native(        "EEN1097 Edge Dashboard",        options,        Box::new(|_cc| Ok(Box::new(EdgeApp::default()))),    )}
Solutions
Section titled “Solutions”There is no video solution for this tutorial, because egui changes too often for a recording to stay correct. Instead, each question has a Show solution box under it with the complete main.rs at the end of that question. Each solution builds on the one before, so you can pick up from any question. Please attempt each question before you open its solution.
The solutions were compiled and run with eframe 0.37.0, egui_plot 0.38.0 and Rust 1.96 on Windows 11, in November 2026.
© 2026 Derek Molloy, Dublin City University. All rights reserved.